Clocks, Timers, and Watchdogs
Prelab due 9/29/25 at 1:00 pm
Writeup due 10/6/24 at 1:00 pm
About
In this lab, you will familiarize yourself with the clocks on your chip, learn to use an automatic timer/counter to create a square waveform of a custom frequency, and get practice setting up a watchdog timer. You will also learn how to use a Piezo speaker and go through the process of running a suite of tests before writing up your circuit.
Lab 4 Rubric
Resources
Materials
Included in your kits:
- Arduino Uno R4 WiFi and USB cable
- Breadboard
- 1 passive piezo speaker
- 1 resistor (220Ω)
- Jumpers/wires
Provided:
- None necessary
Steps
A note on the lab: please try to be mindful of the noise you are creating when testing your code. If at all possible, use the test functions provided and Serial output when debugging. If the speaker is too loud, use a bigger resistor.
-
Before we can play songs on the Arduino, we need to configure our GPT peripheral to toggle at the correct frequency. This step involves no circuits: we will test the frequency in software.
-
Clone or download a zip of the Lab 4 starter code. Open
lab4_song_player.inoin your IDE. Read thetestNotefunction innote_tests.inoand make sure you understand how it works. In particular, note that in order for the test to work, you must not remove theintcount += 1;line in
gptISR(ingpt.ino), because this counts the number of times the ISR has been run. -
At the top of
lab4_song_player.ino, set theCLOCKFREQconstant according to the prelab (this should be the pre-scaled/divided frequency you determined using the prelab). Ingpt.ino, finish the TODOs for step 1 only. You can ctrl/cmd + f for “step 1” to make sure you didn’t miss any TODOs. -
There shouldn’t be anything in the
loopfunction yet. Open the Serial Monitor in your IDE and upload and run your code on the Arduino (without any circuits). If the code doesn’t do what you expected, pull up the debugger and step through theinitGPTfunction to make sure the register values are being set correctly.
What's going on? (read after using the debugger)
This is one of the things our datasheet guide warned you about! The Arduino core disables a lot of the peripherals on the RA4M1 by default using the low power mode control registers. In order to be able to configure the GPT, you need to first enable the peripheral on the device. Browse through the bitfield descriptions in sections 10.2.2-10.2.5 of the datasheet to find where the GPT2 peripheral (also known as GPT162, because it uses 16-bit registers) is enabled/disabled, and set the corresponding bit in the corresponding register at the top ofinitGPT. This should only take one line of code, and, since you're setting a single bit without disturbing the others, you can use the_bnotation. If you get stuck, ask a TA for help.d. After making the fix, try again! If you get the result that “All tests passed!”, go on to the next step. Otherwise, debug your code. Have your prelab available, which will help the TAs help you.
-
-
Now make the code play a song on the piezo! Wire up the following circuit:
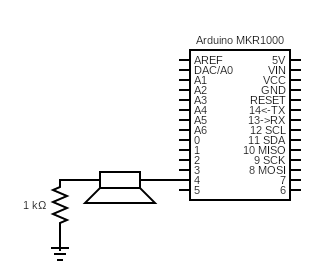
Note your kit might include two piezo speakers – one active and one passive. You should use the passive one (the one that doesn’t have the sticker that says “remove after washing.” It also has some exposed metal on the underside, whereas the active one is covered in black plastic). Take heed to orient the “+” leg so that it is connected to the Arduino.
-
Using the skills you learned in lab 3, determine the port/pin number that corresponds to pin 4 on the Arduino, and set the constants at the top of
lab4_song_player.inoaccordingly. Insetup, configure this pin as a GPIO output. Ingpt.ino, makegptISRtoggle this pin (remember the XOR trick from lab 3!), and makestopPlayturn the pin off. These are the only changes you need to make ingpt.inofor this step. If you run the code now, you should hear notes play (starting with B0 and ending with D#8) whentestAllNotesruns. -
Remove the line with
testAllNotesfrom thesetupfunction and uncomment the song parsing. -
Modify the
loopfunction to play the song note by note by callingplayNoteDuration, and then pause for two seconds before playing it again. Use a local static variable, as opposed to a global variable, to keep track of which note to play in the current call ofloop. -
Upload, run, and debug your code. When you think it works, get it checked off by a TA. You can access more songs here.
-
-
Now you will configure a watchdog timer to check for hangs in your code.
-
In
wdt.ino, fill in thepetWdtfunction. -
In
lab4_song_player.ino, pet the watchdog once every iteration of theloopfunction. -
As you saw in your homework, The RA4M1 supports windowing to prevent pretting the watchdog accidentally. However, as in your prelab, we’re going to use a 100% window, meaning that thw watchdog can be pet at any time. Why did we make this choice? With your partner, discuss why a 50% refresh-permitted period (that would only permit the watchdog to be pet in the second half of its timeout) would not be easy to work with when we are petting the watchdog at every note.
-
In
wdt.ino, fill in theinitWDTfunction using what you learned in the prelab. -
Run the code as-is. Because all of the notes and pauses between songs are 2s or shorter, the watchdog should not bark. Note: it is fine to shorten the song itself (e.g.
"spooky:d=4,o=6,b=127:8c,f,8a,f,8c"') for ease of testing. -
Change the delay between songs to be 20 seconds. Don’t make any other changes. Observe the watchdog bark. You’ll be asked to demonstrate this functionality in the next step – be ready to toggle the specific bit and reupload.
-
Change one bit you wrote in
initWDTto make the watchdog reset the board instead of triggering an interrupt (you read about this bit in prelab Q6.4). You don’t have to disable the ICU connection to CPU interrupts here – because the WDT will no longer produce an interrupt, the ICU and therefore the CPU will simply not receive an interrupt. Run the code, and observe the board restart. Get checked off by a TA.
-
-
Nice job! Now we can play songs and detect software hangs. What more do we need from life? Well, it would be nice to run some other code while our song is playing, but because
playNoteDurationis a blocking function, we can’t really do much else inloopwhile waiting for the notes to complete. In this step, we’ll set upGPT3/GPT163to control the note playing, instead of replying onloop/playNoteDuration. We want aGPT3interrupt to fire every time a note is done playing, upon which we play the next note and set upGPT3to fire again once the note is over.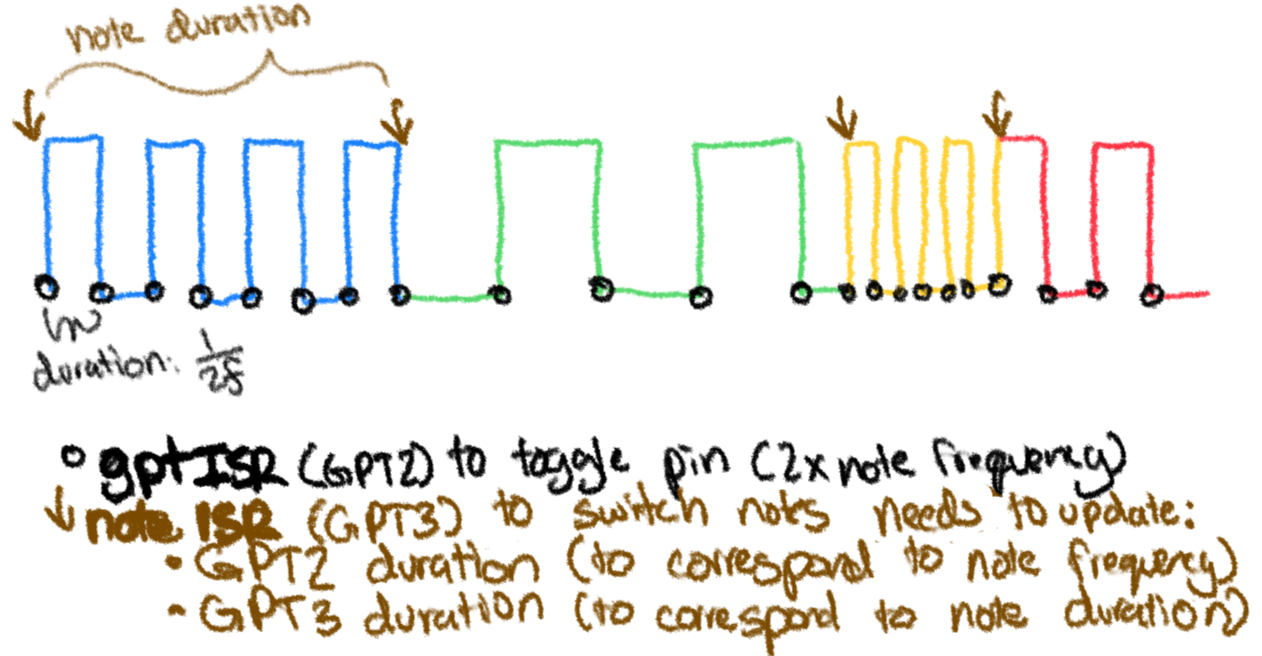
Because GPT3 is just another timer, you can use everything you learned when configuring GPT2 to configure GPT3.
a. Just to make debugging simpler, disable the WDT for this step (comment out the calls to
initWDTandpetWDTinlab4_song_player.ino).b. Comment everything out in
loop. Change thesongto be “Pinkpanth”. This is important, because the notes/rests in this song range from 93ms to 750ms. We’ll come back to the idea of playing different songs in the lab writeup.c. In
initGPT, uncomment the call toinitNoteGPT, and fill in the body of this function. This should be very similar to the body ofinitGPT, except:-
We are setting up GPT3, not GPT2 (be careful about this if you choose to copy-paste code).
-
We are connecting the GPT3 interrupt to the
noteISRvia theNOTE_INTinterrupt. Remember to look up the correct event number for GPT3 overflow in table 13.4. -
We are choosing the prescaler for the GPT3 clock such that we can count up to 750ms if needed. You will have to look at the datasheet and do some math for this (we did similar math in the timers lecture). GPT3 uses a 16-bit counter – if the timer were to count to the highest number of clock ticks, how long would that take at every prescaled frequency?
d. Fill in
noteISRsuch that:-
It stops playing the last note that was played by calling
stopPlayand starts playing the next note that should be played by callingplayNote, just like you did in theloop/playNoteDurationfor step 2. Because those helpers are in charge of toggling the pin, you don’t have to do anything with the GPT2 registers directly in the body ofnoteISR. -
It starts the GPT3 timer for the next
noteISRinterrupt (basically, the interrupt schedules its own next trigger, and the song doesn’t need to be controlled at all inloop). To compute the number of clock ticks needed, you will need the effective frequency of the GPT3 clock after division in Hz (just like the computation you did in prelab Q4.3). For a given duration (say 93ms), and keeping in mind that one Hz represents one tick per second, how many clock ticks need to happen? Don’t forget about units –noteDurationsstores time in milliseconds (0.0001s), so you will have to divide by 1000.
When you reach the end of the song, you can either start at the beginning or stop playing altogether.
Keep in mind that starting a count involves two steps: 1) setting the right value to count up to and 2) starting the count (this is exactly what
playNotedoes on a smaller scale). You will also have to kick off the first trigger of the GPT3 interrupt ininitNoteGPT, so that the song can start playing. What counter value can you set so that this happens immediately?e. Once you have this working, get checked off by a TA. Good job, now you have the option to concurrently run other code while your song is playing. This is very useful from a scheduling perspective (imagine coding up an arcade game with visuals and music – now your
looponly has to control the visuals, while GPT3 controls the music). The only issue is that the CPU is still being asked to toggle the pin (ingptISR). What if we could set an output frequency and let the MCU hardware toggle an output pin, so that we only needed the control interrupt (noteISR)? This would decrease our CPU usage and likely make the timing a bit more accurate, since we’re not relying on a write to a register every time we want to toggle the pin. In the writeup, you will explore how you can connect the GPT peripheral directly to an I/O pin. -
-
OPTIONAL STEP JUST FOR FUN One advantage the CPU interrupt has is that it gives us better control over the exact output signal we get, if we want to get fancy. To some extent, we can’t produce an amazing sound quality, no matter how well we understand I/O signals – the piezo speaker isn’t exactly a hi-def device. However, we do have a bit of control over the shape of sound wave we produce. Because we are toggling the pin between on/off (0V/5V) at a set frequency, we are outputting a square wave on the piezo (yellow line):
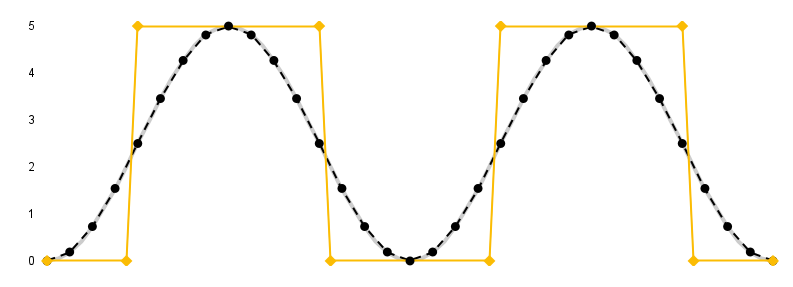
The smooth, gray wave in the picture is a sinusoid. Due to various physics-related reasons, a square wave is going to sound tinnier than a sine wave. While we cannot output a perfectly smooth sine wave, we can output a decent approximation using some pre-computed voltages sampled at even intervals on the sinusoid.
We were able to output a square wave because we configured our GPT2 interrupt to trigger 2 times within a given note’s period. The first time, we drove the pin low (0V) and the second time, we drove the pin high (5V). If we interrupt more often (say, 16 times within a given note’s period), and generate a corresponding output between 0V and 5V, we would have the dotted black line output. We’ve even pre-computed the voltage values here, in column E. In the first interrupt, we would output 0V, in the second, we would output 0.1903 V, and so on. Just like we did math to make sure that the GPT interrupt for the square wave fired twice a period for a given note frequency, we would do math to make sure the GPT interrupt for the sinusoid approximation fires 16 times a period for a given note frequency.
For the following steps, you should have a compile-time flag that triggers between a square wave and a sinusoid, e.g. have
#define SINUSOIDat the top of the file (which you can comment out if you don’t want a sinusoid), and then have
   #ifdef SINUSOID
   [code for sinusoid]
   # else
   [original code for square wave]
   # endif
in relevant places in the code.
-
Change the calculation of n in
playNoteso that the interrupt fires 16 times a period instead of 2. You don’t have to changeinitGPT. -
Change
gptISRso that it’s outputting the sinusoid approximation. What pin must you be using to output voltages between 0 and 5V (think back to lab 2!)? You can use Arduino API calls (instead of bare metal programming) here. Even though we’ve precomputed the voltage values for you, you shouldn’t be doing floating-point math in order to output the intermediate voltages. Instead, decide on a resolution you’re going to use (don’t forget to set this resolution insetup), and modify the given spreadsheet so that column E has the integer values that you need in order to produce your output (you can useROUNDin Google sheets to round a value to the nearest integer). Check yourself: the lowest value in column E should be 0, and the highest should be 2^[resolution] - 1. You can then copy-paste the list of integer values in cell G2 and use it in a constant integer array used bygptISR. How can you keep track of which value in the array you should be outputting during the current iteration of the ISR?Also remember to output 0V in
stopPlay. -
Test out your code. Do the songs sound different?
Hearing a weird clicking sound?
It might be because you're calling `stopPlay` between every note and/or resetting how you're stepping through the array of output values. If you produce an output of 0V between every note, this will manifest as an audible interruption between notes. Even if you resolve this and allow for a smooth transition between notes, you might still hear a weird sound quality, which can be due to the properties of the piezo speaker and/or the quantization/sampling error of the output. That's okay! Getting audio to sound nice on digital devices is something people have spent a lot of time and money on, and for the purposes of CS1600 lab 4, we're going to call it good enough here. -
-
Turn in your work:
-
Upload
lab4_song_player.ino,wdt.ino, andgpt.inoto the “Lab 4 Code” assignment on Gradescope (include all partner(s) on the submission). You do not have to upload the four helper files that we gave you. -
INDIVIDUALLY, complete the Lab 4 writeup assignment on Gradescope.
-